Courting Creativity

How does one sustain creative work? I’ve hit that point in the development of this blog (and I knew I would hit it because I do in every project I’ve ever undertaken) where the shine has worn a bit and I’ve begun to stutter and then to stop creating. This week was filled with failures. I failed to keep up with my daily sketching. I failed to do any watercolor exercises. I failed to plan ahead on what I wanted to blog about this week. And it wasn’t due to being too busy or any good excuse, I just didn’t feel inspired. Hello, sloth, my old friend…

I’m not sure if everyone struggles with sustaining effort to the same degree that I do, but I know it’s been the bane of many an artist. The main piece of advice seems to be DO ART ANYWAYS NO MATTER WHAT. For a bit more elaborate and bizarre advice I turned to a chapter in the fantastic book A Natural History of the Senses, in which author Diane Ackerman describes different tricks and rituals that many writers and artists have enacted to try to keep the fire alive:

“Katherine Mansfield once said that it took ‘terrific hard gardening’ to produce inspiration… Dame Edith Sitwell used to lie in an open coffin for a while before she began her day’s writing… The poet Schiller used to keep rotten apples under the lid of his desk and inhale their pungent bouquet when he needed to find the right word… Amy Lowell, like George Sand, enjoyed smoking cigars while writing… Both Dr. Samuel Johnson and the poet W.H. Auden drank colossal amounts of tea—Johnson was reported to have frequently drunk twenty-four cups in one sitting… Victor Hugo, Benjamin Franklin, and many others felt that they did their best work if they wrote in the nude… The Romantics, of course, were fond of opium… The list of writers triggered to inspirational highs by alcohol would occupy a small, damp book. T.S. Eliot’s tonic was viral—he preferred writing when he had a head cold… Many writers I know become fixated on a single piece of music when they are writing a book, and play the same piece of music perhaps a thousand times in the course of a year… The poets May Swenson and Howard Nemerov both told me that they like to sit for a short spell each day and copy down whatever pours through their heads from ‘the Great Dictator,’ as Nemerov labels it, then plow through to see what gems may lie hidden in the rock.”

While I won’t be going out to buy my very own coffin, I love the variety of ways people have found to cultivate their creative endeavors. I used to think that one day I’d “find” my true passion and then I’d doggedly follow that unending desire with the ease of an addict. But I’ve begun to believe that such thinking was all wrong, and that passion for me is about cultivation and will require real effort and intention, not just the ease of “this is all I want to do for always.”

Creative Compulsive Journal Cover

Now I just need to discover my own rituals, structures, and idiosyncrasies that will allow the chaos of creativity to become a sustaining force in my daily life, not just a new shiny toy that quickly dulls. The one productive creative endeavor I did complete this week was to set up a new notebook dedicated to this project and any inspirations, thoughts, questions that may arise. I’ve also discovered that my daily sketchings are best when done right in the morning with my coffee lest I forget to draw the rest of the day. Not as exciting as huffing rotten apples or drinking dangerous amounts of tea, but a gal’s got to start courting creativity somewhere.

BONUS for reading this far: next week, I’m going to share with you something amazing about… MOSQUITOES!!!

The Artist’s Way

My mom was obsessed with The Artist’s Way when I was a kid. I remember this book having such an effect on her that it always lingered in the back of my mind as something that I should read. Now that Jessie and I have created this space to nurture our own creativity, the time is definitely right to delve into this quintessential book on creativity.

This book is bomb, y’all.

The Artist’s Way is a 12-week course meant to “discover and recover your creative self.” This course includes a ton of tools and exercises. One of these tools is the “morning pages.” “Morning pages” are three pages of longhand writing, written each day. The point of these pages is to get to the other side “of our fear, of our negativity, of our moods.” I have been doing my morning pages for nearly a week now. It feels great to brain dump the bullshit before I start my day!

In the first week of exercises, we are supposed to use part of our morning pages to turn negative self-talk (i.e. “blurts”) into positive affirmations.

Some of my “blurts” are:

  • It’s too late! You should have started when you were five!
  • You don’t have time for all that! You have a house to clean! A business to run! Law to do!
  • You will never reach the skill level you aspire to!

Even if I am not consciously thinking these things, these damaging thoughts are lurking in the background and seeping into everything I do. So, here are my “blurts” turned into positive affirmations!

  • It’s too late! You should have started when you were five!

I am starting my creative journey at the perfect time! I have a fully developed brain, awesome ideas, and hella precise fine motor skills!

  • You don’t have time for all that! You have a house to clean! A business to run! Law to do!

I have time! I can make time! My creative endeavors will only enrich the other areas of my life!

  • You will never reach the skill level you aspire to.

My skills are going to be dope AF. I have already improved so much in the areas I have been working on and I will only get better!

 It’s just been a few days since I have started reading this book and doing the exercises and I am already seeing a difference in my thinking. I am excited to see where this goes!

Watercolor Exercises: Flex Those Brushes

I’ve been playing around with watercolor for a few months now, but I’ve never taken the time to try to understand how this medium really works. While it seems simple on the surface, let me assure you, watercolor is not easy. Yes, there are only four main components: paint, water, brushes, and paper. But the variety of ways these four can interact is endlessly complex and very difficult as a beginner to undertake.

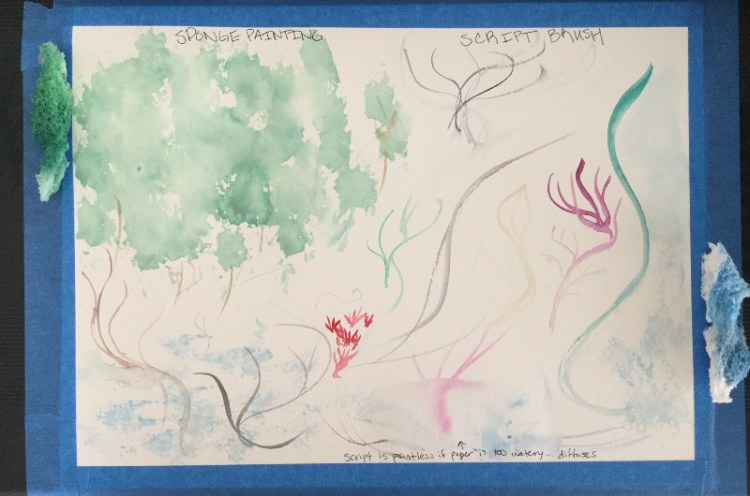
Fortunately, I have Gordon MacKenzie’s The Complete Watercolorist’s Essential Notebook to help guide me. Early in the book he recommends getting to know one’s brushes through simple exercises. This week, I undertook this exploration with the three different brush types I’ve purchased so far: a round, a flat, and a script. While exploring the different shapes each brush offers, I was also trying to understand better how the water and paint interact on the brush and on the paper.

Round Brush Exercise

The round brush is great for making lines that vary from thin to thick and is very versatile. For my practice sheet I tried varying the amount of water I placed on the paper and the amount of water and paint I held on my brush. Dry paper with a paint-heavy brush allows for super intense lines but doesn’t have much flow. Putting water on the paper and then painting over it with a brush that isn’t super wet leads to a very jagged shape (see the spermy-looking thing in the bottom right corner). Wet paper with a wet brush allows for the most flow of paint over the canvas (see bottom left corner). Dry paper with a very water-heavy brush leads to what’s known as a water spot (see top left corner).

Flat brush exercise

The flat brush is a go-to for backgrounds and thick flatter shapes. I played mostly with different amounts of water on the brush vs. the paper as I’m still trying to figure out how to make backgrounds and skies look more natural. Super wet paper and a water heavy brush makes for some really interesting shapes but also leaves unnatural looking dark edges. A more tempered amount of wetness on the paper and brush leads to a very even distribution of paint. The less water on the paper and brush obviously the harder it is to get paint to flow on the paper.

Script brush exercise

The script brush is amazing for creating fine flowing lines and is super fun to paint with. I tried using the script brush on an area of the paper that I had wetted and it completely diffused the lines, defeating the whole purpose of the brush. So, I know this one is best used on a mostly dry surface. I also played around with cutting up some sponges and sponging paint on the paper. Creates some great shapes, and would work well for forests and clouds.

What I’ve learned so far in my explorations is that watercolor is not an obedient medium. I can’t just put paint on a brush and water on the paper and expect it to do what I want. There is a free-flowing quality that just can’t be overcome by will or covered up by mashing on more paint. As MacKenzie says “Try to push this medium around, and it quickly loses its charm, its transparent radiance and its life.”

As a bonus for getting this far with me, here’s my super fancy painting workspace in our tiny apartment (yes, it is a counter):

Painting workspace

So I have this daydream about charcoal . . .

I’ve wanted to start experimenting with charcoal for awhile. I love how it looks and how messy it is to use. With charcoal I can pretend I am an old-timey French artist in Montmartre drawing dancing girls and flowers. Anyway, my mom sent me charcoal drawing pencils and some willow charcoal. I proceeded to let it languish in my closet for several weeks. BUT THEN Jessie inspired me! I used the “look, hold, draw” method she wrote about a couple weeks ago (relive the magic here). In addition to my charcoal dreams, I had some dead lilies that I have wanted to draw/photograph/do something cool with for the longest. SO with the inspiration from Jessie, the charcoal from my mom, and the dead lilies from myself, I WAS READY!

I tried to draw the entire lily with my willow charcoal. This happened.


I found the willow charcoal hard to draw with. The thing I LOVE about charcoal is how thick and smudgy you can make the lines. But, instead of trying to make the beautiful, wide, smudgy lines I love, I treated the charcoal like a regular ol’ pencil. It didn’t work.

Next, I tried drawing just one of the beautiful, curling leaves on the lily. I used one of the softer charcoal drawing pencils and had better results. It actually looks like the leaf I was drawing! So exciting! I definitely liked using the charcoal pencils better.

I tried a couple more times using the willow charcoal and some of the other charcoal drawing pencils. Here are the results!

I was a bit lazy and unfocused while drawing. Though I love the idea of drawing (see my old-timey Montmartre daydreams above), I can’t say that I love the actual drawing. I am not sure if it’s because I’m salty about not being very good or if it’s because I actually don’t like it. I am going to start drawing more so I can figure that out.

Blind Drawing: You Try Not Looking

It’s so difficult for me not to continuously look at the page while drawing. It’s like my eyes don’t believe I have hands I can draw with unless they’re looking right at them while drawing. If you recall from my last post, I’m trying to develop this new habit of actually looking at the subject I’m attempting to draw while drawing, and it’s causing some mental freak out. “NOOOOO,” my brain screams when I finally allow it to look at the paper again, “that looks horrible!”

Bert Dodson (Keys to Drawing) gave me another good pep talk for this struggle: “Most of us have a negative attitude about our own mistakes… Trial and error are essential in drawing. You make lines and compare those to the contours of your subject. Distortions will no doubt occur, and some of these you will want to correct or adjust as you go. You could erase these lines, but it is usually better to leave them for now and simply draw the more accurate lines alongside.”

So this week I’ve been practicing with completely blind drawing (meaning I don’t takes my eyes off the subject throughout the entire drawing process) and a mix of the “look, hold, draw” method from last week. Since my partner Brian is around me all the time, he’s become my mostly willing subject. I keep feeling the need to label my drawings “ugly” so you, the viewer, don’t think I’m just a narcissist who thinks my drawings are great. But I’m going to stop doing that, because it seems like a repetitive and defensive habit, and it goes against the whole point of this blog.

These were my first attempts at a portrait of Brian using the look, hold, draw method:

Look, hold, draw exercise from Bert Dodson's Keys to Drawing

Second attempt, this time with his body included and drawing blind for large portions:

Look, hold, draw exercise from Bert Dodson's Keys to Drawing

Third attempt, with even longer stretches of drawing blind:

Look, hold, draw exercise from Bert Dodson's Keys to Drawing

Fourth attempt:

Look, hold, draw exercise from Bert Dodson's Keys to Drawing

The following were both done entirely blind, so there was no peeking until I had completely finished his portrait (why is it so hard not to look?!):

blind drawing exercise from Bert Dodson's Keys to Drawing

blind drawing exercise from Bert Dodson's Keys to Drawing

Extra special bonus for coming this far (drawing cats blind is harder than herding blind cats)!!!:

blind drawing exercise from Bert Dodson's Keys to Drawing


A Little Flower

I have started learning a new piece called A Little Flower by Cornelius Gurlitt. Over the next few weeks/months (there really is no telling) I will be documenting my progress in understanding and performing this piece.

D Major Scale

In the interest of turning over a new music leaf, I started by practicing the D Major scale. My teacher said that it would improve my finger strength and form when playing. I am usually willy-nilly when it comes to practicing my scales because scales are boring. However, I am trying to do better because as Baryshnikov said, “Fundamentals are the building blocks of fun.”

Scale practice!

Right Hand Alone

When I first learn a piece, I start by practicing with my right hand separately. Usually the right hand plays the melody so it is a quick way for me to get some handle of what is happening in the piece. Additionally, the right hand is usually easier for me to play because I have more control over my right hand (I am right handed) and I can read the notation on the treble clef more automatically than I can the bass clef.

Here is my right hand playing the first page with the pedal!

Left Hand Alone

After I play the right hand part for a while I begrudgingly start learning the left hand. The left hand is usually more difficult for me in the beginning because I don’t know off the top of my head what the notes are. This is definitely an area for growth.

Here is my left hand playing the first page with the pedal!

Hands Together!

After my brain gets a handle on what my hands are supposed to be doing, I play with my hands (and feet) together. I used to put this off for as long as possible because piano is hard. However, now I have started to make it a habit to not punk out when parts of the piece are difficult. These parts get easier when you practice them. Who knew?

Here are my hands and right foot playing the first page! Together! With awkward pauses!


Keys To Drawing Project: Ugly Feet (and Other Sketches)

In the hopes of improving my sketchy drawing skills, I’ve placed myself in the hands of Bert Dodson and his highly recommended book Keys to Drawing. I’ll be going through each of the 48 exercises in the book and sharing some of the results and learning here.

To begin with, I thought I’d show some of the drawings from my sketch book before I entered Dodson’s tutelage, for a before-and-after effect. Some of these images were copied from Pamela Zagarenski’s The Whisper (because I LOVE her illustrations) and a few other random artists, because I’m a copycat and it’s good practice:


July 2017 Sketches 1

July 2017 Sketches 2

July 2017 Sketches 3

As you can see, I prefer to draw with clean lines and I avoid messes at all costs unless it’s pure doodling. I also spent most of my time looking at my pad while drawing rather than the subject itself. These drawing habits of mine are apparently not useful when learning to draw. As Dodson says, “Drawing can be described quite simply: look at the subject and take note of a contour or shape; hold that contour or shape in your mind for a moment, and draw it while it’s still fresh in memory. Look, hold, draw. Look, hold, draw.”

To help with my refocusing on the subject being drawn rather than the drawing itself, I undertook Dodson’s first lesson, Project 1-A–Feet. This project utilizes the practice of blind drawing and I was meant to keep my eyes on my feet while drawing the contours of what I was seeing. I would then look back at the drawing to see how I did, and then return my gaze to my feet to redraw the lines again if necessary (it usually was).

Feet Sketch 1

Feet Sketch 2

Feet & Hands Sketch 3

Basically, I drew a bunch of really ugly feet. I also tried blind drawing with my hands and drew a bunch of ugly hands (with one exception I think).

Hands Sketch 1


A whole lot of ugly… but I also see how the sketches are more alive than the simple clean lines I used before. Drawing blind is uncomfortable for me, and the results are not pleasing, but with practice I can see how the hand and eyes would begin to work in beautiful coordination, and how so much more detail and a sense of movement can be captured when focused on the subject and not the drawing. So, I’m prepared to move into a phase of chaotic drawings, in the hopes of developing a more fluid and detailed style. IT’S THE JOURNEY RIGHT?!

Adventures in Photography Volume III

I did Lab 30 in the magical book, Creative Photography Lab: 52 Fun Exercises for Developing Self-Expression with Your Camera. Well, I kind of did it. The point of this lab was to “create a personal photo journal of your work or daily environment.” I chose this lab because I knew I would be going to court so I figured my workday would be a bit more interesting to document than usual. Also, going to court makes me feel fancy. Anyway, this lab turned out to be a bit of a mess for me. I took nine pictures. Here is one of them.

#courthouse #nofilter #notblackandwhite

In my nine pictures, I did not capture anything I care to remember. There were aspects of my day that were challenging and wonderful and interesting and none of that made it into any of my shots.

One reason I didn’t take pictures, ironically enough, was because I was at court most of the day and it would have been wholly inappropriate for me to do so. I also frequently feel super awkward taking pictures in public. Some (quasi-irrational) piece of me believes that when I take pictures of my surroundings, people will judge me or whatever subject I choose to photograph. I know this doesn’t make sense. However, I have yet to conquer my hang-ups around this.

In addition to feeling awkward, I let myself be limited by what I thought might be interesting or make good photographs. I didn’t really spend any time actually trying to see what was happening around me. I didn’t challenge myself to think about how I could effectively tell the story of my workday even given the nature of my job. Though this lab was a fail in terms of getting pictures I actually want to look at again, I learned a ton. It’s about the journey, right?


The Honeymoon Project

An old college friend invited me to her wedding celebration, and it seemed the perfect opportunity to practice my drawing and watercolor. Instead of buying a card, I would make one, and since my gift was a donation to their honeymoon fund I had my obvious inspiration. As always, there were lessons learned through this process, but I’m also really jazzed with the final results! So, here’s the creation process:

To begin, I had to figure out how on earth one draws honeycomb without it looking like a bunch of poorly drawn circles:

Honeymoon Step 1

I then erased most of my hard work and went over some of the honeycomb design in colored pencil:

Honeymoon Step 2

I applied art masking fluid to the moon in preparation for painting in the background. Also added some splatters to the sky in the hopes of creating a starry night effect:

Honeymoon Step 3

With the masking fluid dried, I drew in the bees:

Honeymoon Step 4

I blundered at this point by thoughtlessly outlining the upfront bees in black ink, only to remember that watercolor involves, well, water and this would make the ink run everywhere. AHHH! My solution was to cover the bees in masking fluid as well and hope for the best:

Honeymoon Step 5

And now for the first layer of the background:

Honeymoon Step 6

I played with various shades of blues and pinks to create a night sky:

Honeymoon Step 7

By this point I’d removed the masking fluid from the moon and bees (which fortunately looked alright) and painted over my honeycomb and began filling in details on my bees:

Honeymoon Step 8


And voila, the final result:

Honeymoon Final

I loved working on this project, and am really happy with how it turned out! It took a lot of doodling to learn how to draw bees that look bee-like. I think my favorite is actually the one in the top left corner, as it seems to fit the overall look of the painting the best. I’ll probably never use ink again on a project involving watercolor, unless I want that masking fluid effect.

I wrote on the back of the card: “Love is the sweetest thing.” A line from one of my favorite old-timey songs, which I am kind enough to share here as a completely random benefit of having read this far:


Adventures in Photography Volume II

So, I got this book called Creative Photography Lab: 52 Fun Exercises for Developing Self-Expression with Your Camera. As the title suggests, this book contains a series of photography labs designed to develop both technical and creative skills in photography.

The first lab in the book is to take thirty shots in thirty minutes on a smartphone. The objective was to “capture an experience by shooting a series of images.” I decided to spend these thirty minutes walking around my neighborhood.

This was a cool exercise for me because I explored areas of my neighborhood that I had never seen before. Additionally, as I was walking I was actually observing my surroundings. I was more present.

This lab was challenging for me because I had to keep stopping myself from editing as I was taking pictures. The gift and curse of digital photography is that you see the result right away. So there were several times when, dissatisfied with a picture, I attempted the shot again and again. It was definitely a struggle for me to let go, take the picture, and keep it moving. I wanted perfection.

Moving forward, one thing that I want to work on is becoming better at seeing with my camera. I am continually bummed by the discrepancy between the cool picture my eye sees and what is actually captured in the picture. I want my subjects to look cool in real life AND in my pictures.

Here are a few of my favorites!

Design a site like this with WordPress.com
Get started